Showing posts with label Canvases. Show all posts

Monday, 18 June 2018

Shadow Boxes


Hello

To make these shadow boxes I reversed a canvas, lined the indent with card, then covered in paper.


For this first box I used Stampendous Hummingbird stamp and die sets, then coloured the images with watercolour pencils. The images were positioned then fixed with glue dots and foam tape. Highlights were added with stickles and star dust pens, then rhinestones added. When dry the frame aperture was covered in acetate, and the frame itself covered in paper. The back of the piece was also papered. Rhinestones and metal dragonflies were added to the frame front, hanging hooks and cord added to the back. The outer sides of the frame were covered in glittered washi tape.


The inside of this box is a laser cut, 4 layer wood design. The pieces are coloured with stardust pens and highlighted with stickles glitter glue and glossy accents.  They are glued to the background. Paper flowers, velvet leaves, a netting butterfly and rhinestones were added. Stamped, coloured and die cut images from Stampendous Build a Bouquet sets, have been added to the outer frame.

These pieces can be displayed on a easel, or hung on the wall.

I hope you enjoy these designs.
Till next time
be happy
BaRb

Saturday, 21 March 2015

Canvas Handmade Swap...

Hello,

I am not sure if I have let you know - I am part of a Handmade Swap Group? Here are some photos of my last creation for the Group...


I created this 30x30 canvas using many dies - Cheery Lynn, Impression Obsession, Tim Holtz Alteration Dies, Spellbinder, Prickley Pear and also assorted punches...


My swap Partner's favourite colours are purple and green, so going with these colours, I started with choosing my paper first and then went from there - choosing dies I felt like playing with and ended up creating this beautiful canvas garden.


Rhinestones, brads, glossy accents, perfect pearls spritz...


A couple of close ups showing the detail...


Needless to say, my swap Partner loved her canvas!

What do you think of my purple and green garden?
Shell
xox

Sunday, 18 January 2015

Valentine Canvas...

Hello,

All things Valentine... Hearts, Love, Red, Lace....

I have created a canvas that features lots of Valentine elements.


I started with a layer of red card which I have torn the edges all the way around, then added a layer of tissue type cloth.  The large scalloped heart is cut using a die from Mpress and then embossed. The Tickets are from Tim Holtz. A strip of lace...


I added 2 gold heart brads and some little handstitched gold crosses to my canvas with some glossy accents on the smaller hearts for a touch of shine.

Have you started creating your Valentine projects yet?

Shell
xox


Thursday, 2 October 2014

Mini Canvas - Create - Handmade Swap Spring 2014

Good Morning,

I am not sure if I have told you - I am a member of a Handmade Swap Group in Australia.  We are given a name and a small profile of another member, whom we are to send our gift to...  My recipient this time is a papercrafter herself, so I created a mini canvas for her...


First I cut a square of calico, large enough to cover the 6x6 canvas, then using pinking shears I cut a square of patterned material smaller than the canvas front.  I hand-sewed this square to the centre of the calico and then adhered these to the canvas using double sided hi-tack tape and my hot glue gun. Also using the hot glue gun, I adhered a strip of gold sequins and a beaded ribbon down the left hand side of the patterned material.   My next step was to crochet 3 flowers and a butterfly in colours that co-ordinated with the beautiful patterned fabric.


I adhered a selection of acrylic flower centres to the flowers and a bead cut from the beaded ribbon to create the butterfly's body. Next I added a Label featuring the word "Create" (Stamp and label punch are Stampin' Up products). Beautiful isn't it???  My recipient has received her Canvas - she says she is looking forward to hanging it in her new craft room!


I thought I would also show you the back... I needed to hide all the folds of the calico, the best thing to do was to use a thicker piece of card and adhere this using my hot glue gun - folds hidden and gold sequin ends tucked under.  Also in my package to this recipient, I crocheted some more flowers and butterflies so she can use them however she wishes....

For more details regarding the Handmade Swap Group go to: /http://handmadeswap.com/

Happy creating,
Shell
xox


Wednesday, 17 September 2014

Australia Mini Canvas...

Hello.

I am still playing with my Australian animal and Australia Map stamps...

Here is another Mini Canvas I have created for a Friend's Japanese Niece, who was visiting for a week...


I stamped and black embossed the animal images, coloured the kangaroo, koala and kookaburra with watercolour pencils.  I coloured the Darkroom Door Butterfly with copic marker and then glossy accented all of the animals.

I added ribbon with a brass Australia charm, also added a sticker to the map of Australia which is an Eclectic Images stamp, as is the wording.

See you again soon,
Shell
xox

Monday, 28 July 2014

Steampunk Canvas...

Sprockets, cogs, owls, gears.... All things Steampunk - gotta love them!!!

Hi, today I am sharing with you one of my most favourite projects that I have ever created! A Steampunk reverse canvas. (Reverse canvas meaning you turn the canvas around and create your project in/on the back of the canvas).

Now, please excuse the photos - with all the shinyness of the bling and silver card - it was really hard to take great photos!


The canvas I used is a 15cm x 15xm (6x6) canvas, which I covered with Stampin' Up paper. I then ran some silver foil cardstock through my cuttlebug using Tim Holtz Alterations Steampunk Texture Fade Embossing folder.  This is the background of the canvas - before I adhered this into the back I randomly swiped Black Stazon Ink all over it to give a weathered look.

Next, I set to work cutting cogs, sprockets, leaves, birdhouses, a fence, grass, a butterfly and two owls. (I will list at the bottom the dies etc I have used).


I used various cardstock and papers to create my canvas - black cardstock and metallic papers, shiny silvers and brushed silver cardstock.


Can you see the fairy charm and the cog charm?

Now for a list of the products....

Canvas 15cm x 15 cm
Stampin Up Paper to cover the canvas and for birdhouses
Black Card for sprockets
Black metallic paper for grass along bottom of canvas front
Silver Foil card for background and owls
Stampin Up Brushed silver cardstock for fence, leaves, cogs and butterfly
Tim Holtz Alterations Steampunk Texture Fade
Tim Holtz Alterations Garden Greens Bigz Die
Tim Holtz Alterations Gadget Gears Bigz Die
Taylored Expressions Die - Sprockets Border
Cheery Lyn Designs Die - Owls with Gears
Cheery Lyn Designs Die - Gears Butterfly
Impression Obsession Die - Birdhouses
Impression Obsession Die - Grass
Impression Obsession Die - Fence
Fairy Charm
Cog Charm
Assorted rhinestones and bling
Coil and reed embellishments
Stampin Up Brads in sprocket centres
American Crafts Zing Glitter Black emboss powder for detail on cogs
Black Stazon ink
Silver twine

Phew, I think that is all!  If there is anything I have forgotten - please let me know!!

Hope you like my Steampunk Garden as much as I do!?!
If you wish to purchase this fabulous creation, please visit:

Thank you for popping in on us again, we will be back again soon!
Shell
xox


Tuesday, 1 July 2014

Australia Canvases

Good Morning,

Australia really is a lucky country!! One of our Canadian teachers became an Australian the other day - how exciting for her!!  Aussie, Aussie, Aussie!!!


Here is a couple more of the Australia Canvases I have created.  I have used the same stamps and embellishments on both of these canvases - the only difference is the background paper.

Australians' all let us rejoice......
Shell
xox

Saturday, 15 March 2014

Multi Media Canvas - Creating With Riss

Good Morning,

I have a fantastic project to show you, created by the beautiful and very talented Riss.  It is her version of the Finnabair Mixed Media / Multi Media Canvas.


There are so many elements to this beautiful canvas and of course not to mention many hours works involved in creating something so visually exciting!  First, Riss prepared the canvas by painting with Gesso, this acts as a primer for your paint / mists etc.  Then, chose her main image which is a cutout from a magazine.  After collecting elements from everywhere and I mean everywhere - (have a look closely - you will find stationery, things from the sewing box, things from the tool shed, money, keys.....) Riss then adhered all her goodies to the canvas using a hot glue gun - yes imagine the glue cobwebs on a project like this - I am sure those of you who have used a hot glue gun will know what I mean!!

Top Left corner.

Chipboards, peg, bottletop nest with beaded eggs, tap washers, flowers...

.
Bottom Left Corner.

Beads, Coils of chain, money, a magnet, a rivet, paperclips, a key .....


Top Right Corner.

Chipboard, hairclip, beaded lady beetle, lace with a buckle, flowers and beads .....                                                                                                                                                                                                                                                                                                                                                                                                              

Bottom Right Corner.

Lace Doily, Tassel, paperclip, beads, wire and mesh dragonfly .... 


And the list goes on.. .. of the many, many elements Riss added to her Canvas.  After gluing everything into place, Riss then coated the whole canvas (Except for the image) with Gesso again - using a paintbrush to ensure that every surface was coated (especially in all the little fiddly places between elements).  She then coated her canvas with Mist which we created using Perfect pearls powder mixed with water and a slightly watered down acrylic paint (to make it more brushable into all the fiddly spots).  This required a couple of coats to build up the layers to the vibrant colour she wanted and then the drying time!!  

How amazing is this... one of those things you could look at for hours and still find things!
Happy Creating...
Shell
xox

Saturday, 18 January 2014

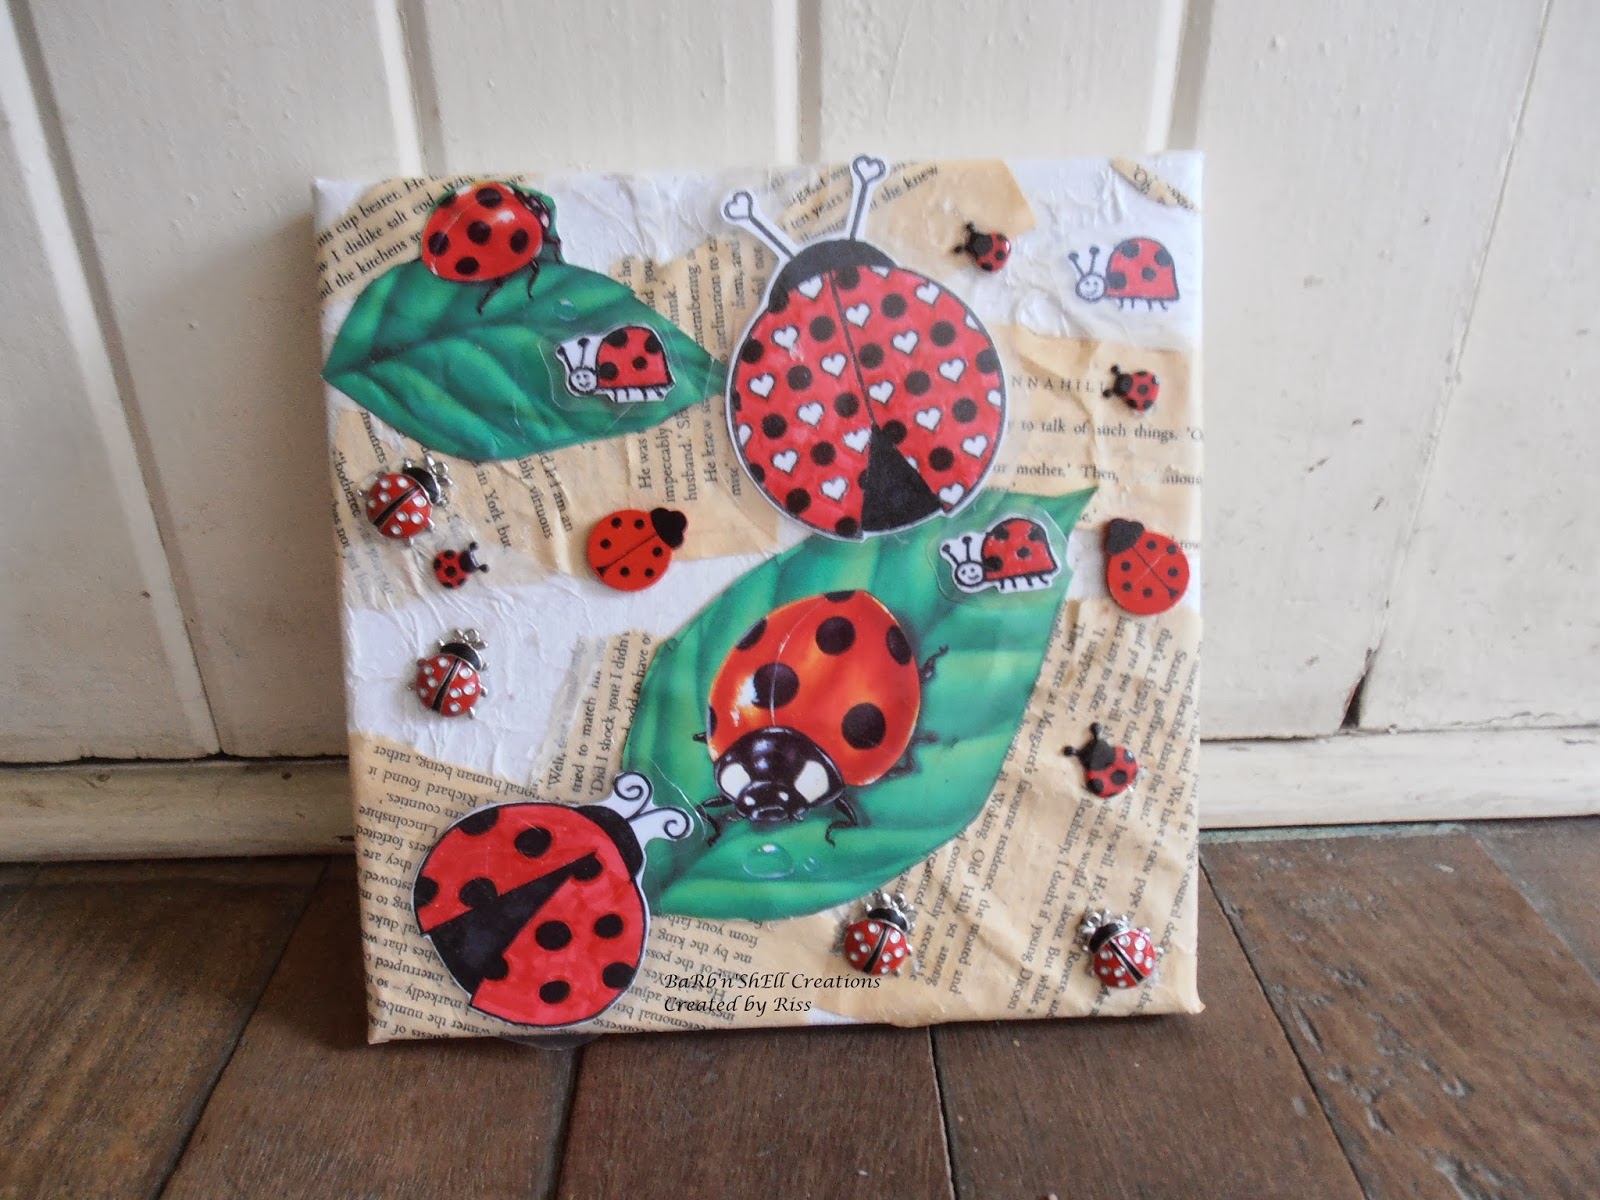
Lady Beetle Addiction

Hello,

Hehe - caught your interest with the title didn't I??  Who doesn't love Lady Beetles??  Some people call them Lady Bugs same thing....

Our Guest Designer - Riss - is highly addicted to Lady Beetles - she has pencil cases, pens, brooches, blankets, charms - lots and lots of Lady Beetleness (is that a word?) - she loves them!!!

Riss was 10 years old when she made this canvas - she has used a few different types of Beetles here - Charms, puffy stickers, wrapping paper and hand-drawn images of Beetles - fantastic! Love it, Love it!!


Riss created this canvas with a Multi Media style background - paper tearing and tissue paper to create texture, then added her collection of Lady Beetles.  The red, black and green really stand out against the neutral colours of the background.

How could you not love Lady Beetles - must be the red and black combination of colours!!

Enjoy!
Shell
xox


Sunday, 12 January 2014

Fisherman's Canvas

Hello

Is there a Male in your life who loves to fish?  I have a couple of those!!  A canvas is a great way to show off some of those fantastic fishing catches!  "I caught a fish this Big! ......................."

Here is another Canvas I have created - I guess you can say it is a Multi Media Canvas...


For the background, I stamped the Journal Entry Stampin Up stamp all over tissue paper, which I then crumpled and adhered to my canvas using impasto gel.  I then randomly painted the canvas with black gesso.  


I heat embossed The "Gone Fishing" chipboard with a couple of different colours and added two Trout Brads.  With the same embossing powder I added small sections all over the canvas to tie it all in.


Using twine, fishing line, charms and a sinker (From my Husband's Shed) I created an embellishment for the bottom corner.


I hot glued the fishing lure (yes I did check that this was not one of his favourites!!) onto the canvas.  The lure was where I actually chose the colours for my canvas from.  I wanted it to appear murky like a creek or a river where you would go fishing.  The stamped images were from a couple of different stamps sets from Darkroom Door and Stampin Up.  These images were all heat embossed with black embossing powder.

Anchors, ropes, compasses, speed boats and of course you can't forget the camping chair to sit on!

Happy fishing - and crafting
Shell
xox

Button Heart Canvas

Hello, how's things?

Buttons, buttons everywhere...  Are you like me and have a stash of buttons - all different shapes, sizes and colours??  I remember when I was a little girl at school there was a saying - "Find a penny, pick it up, all day long you'll have good luck!!  (Heard that one before haven't you?!?)  Anyway, one of my little school friends changed it and said - "Find a button, pick it up, all day long you'll have good luck!"   So, every button I saw from then on - I picked up - okay, maybe this is where my collection started.....

Today we have a project from our  "Guest Designer" - Riss.  This is one her fantastic creations - a Heart Canvas - made using buttons.


Looks fantastic - doesn't it!?!  Love the different shapes, sizes and colours used here!  Notice the lady beetles in there? 

This is one of those projects that the longer you look at it - the more things you seem to see!!
We will be featuring more of Riss's Crafty Creations.

Make a button creation today!
Shell
xox

Saturday, 11 January 2014

Melted Crayon Canvas

Hello,

Have you ever melted a crayon??  This melted crayon technique is really amazing to watch!! Riss created this canvas after seeing one her cousin had made - it was shown on a television show - (I think "Better Homes and Gardens"???)


Great isn't it!  First Riss laid out her crayons in the colour pattern she liked - then used a hot glue to glue them into place.  Then, very carefully as the wax from the crayons can get very hot as it melts - she melted it with a heat gun.  As you are controlling the gun you can decide how much or how little you melt the crayon!!

Cool technique huh!
See you again soon,
Shell
xox


Multi Media Canvas

Hello Multi Media Lovers!

I happened across (as you do!) a blog from an unbelievably creative artist - Finnabair...  If you have not seen any of her creations - you need, yes I said need to check out her blog (I have put a link to her blog to the right).  I was so inspired - I just had to make a Multi Media Canvas of my own...


The piece I based my theme on for my canvas was the chipboard dressing table/duchess.  It inspired me to create a little girl's room - as if I was looking into the room -  through the open curtains. 


I created this Multi Media Canvas for an 11th Birthday Present.  If you look closely you can see that I have used many, many different types of goodies.  I raided my Husband's shed and found lots of things there, raided my buttons and all my little bits and pieces of things - I have even counted some of the elements to make sure there was 11 of each i.e. 11 butterflies, 11 dragonflies, 11 hearts, 11 stars, 11 Lady Beetles etc, as well as using a chandelier, a starfish, an angel, a bird, an owl, flowers - so, so many things....

First you prepare your canvas (gesso), then start adding all of your goodies - time consuming but sooo much fun!  Then you coat it all in gesso again to prepare it for whatever (paint/spray...) type medium you will be colouring your canvas with, then colour away!  I used watered down acrylic paint for my canvas, which I applied using a fine paintbrush to make sure the paint went into all the little gaps between all those elements!

As you can see - you can use absolutely anything on a Multi Media Canvas - So when you hear people say that they don't throw anything away - this is where they use it!!.  I have created a couple of other canvases and I will show them to you soon.

Happy Creating
Shell
xox  


Monday, 23 December 2013

Dusty Attic - Dreamcatcher

Good morning and here's hoping you had good dreams....

I have always had a fascination for Dreamcatchers - my Son has a couple in his room - they just always seems so calming.  Before I started this blog, I looked up Dreamcatchers on Wikipedia and here are some parts of their meaning:

"Two spider webs were usually hung on the hoop, and it was said that they "caught any harm that might be in the air as a spider's web catches and holds whatever comes in contact with it." "Only good dreams would be allowed to filter through… Bad dreams would stay in the net, disappearing with the light of day." Good dreams would pass through and slide down the feathers to the sleeper. The feathers placed at the bottom of the dreamcatcher also had meaning. It meant breath, or air, it is essential for life. If an owl feather was used, it means wisdom, which was a woman's feather."

Beautiful hey....  Many Native Americans feel that Dreamcatchers have been over-commercialised - in this world I guess what isn't??

I fell in love with Dusty Attic's Dreamcatcher and I knew straightaway what I would make with it....


I bought a canvas and painted it with black Gesso and then I watered down some gold paint and dribbled it down the canvas.  I did say down the canvas - I then decided that the Dreamcatcher got 'lost' in the gold at the top so I turned my canvas upsidedown and was happy... even though my dribbled gold now goes up!  Painted my Dreamcatcher - the photo shows it not yet finished, added a gold charm in the middle with a green glitter brad.


I played around with different ideas for the canvas - ended up spritzing it, added a leaf vine with roses, a double layered die-cut steampunk butterfly, ribbon, lace and chain.


After I glued the Dreamcatcher in place - I added detail to the feathers, some rhinestones, perfect pearls on the strands to represent beads and I painted some glitter paint onto the hoop.  It was a little difficult to take a great photo - because of the spritz on the canvas and the metallic paint on the green leaves!  I then added the word "Dream" to finish off.


The hoops of the Dreamcatchers were generally made from willow and they were decorated with everyday findings - feathers, arrow heads, beads etc.  What a beautiful tradition...

One of my Dad's sayings is "Keep your Nightmares in the Stable" - 
maybe we just needed a Dreamcatcher!

They say if you have a good day - you will have good dreams -
in that case....
Have a great Day...
Shell
xox


Friday, 1 November 2013

Stampin'up Secret Garden

Hello Everyone

We have now hit November, and summer is certainly here. Today a little visit to Secret Garden.


This first version was made as either a card or a stand alone art piece. The base of the design is on natural white card. The backing piece is pool party co'ordinations which has been embossed with the cloud folder. Papers were from print poetry stack, and dsp pad. Flowers and leaves are in primrose, summer starfruit and gumball green, stamped in versamark and clear embossed. The Telephone box is from Feeling sentimental. The sentiments from Sassy salutations and Word play. Pearls and a build-a brad were also used.
The idea of the stand alone piece, is that a photo can be inserted in place of the stamped telephone box image. This would make a lovely end of year memento.


This second version is a mini canvas and also utilises Summer afternoon stamp set.
Card is bashful blue and vanilla with the leaves in olive. paper is also olive. Image is stamped in espresso, coloured with watercolour pencils and an aquabrush and the plant pot is coated in crystal effects.
The flowers are stamped in versamark and embossed with tangerine powder. They are touched up with shimmer paint. The leaves are clear embossed.
Butterflies are die cut with beautiful wing embosslits from marina mist and vellum. A couple of twisted wire strands, a paper daisy, a pearl and some rhinestones for the flower centres finish off.

I hope you have enjoyed your visit today.
Until next time
BaRb


Sunday, 20 October 2013

Make It Crafty - Mushroom House - Mini Canvas

Good Morning - another beautiful Sunday morning!!

Don't you just love mushrooms - don't like to eat them (only on pizza of course).  This beautiful mushroom is a Make it Crafty rubber stamp named - Mushroom House.  I needed to make a birthday gift for a person who loves fairies - I have angel stamps, many little girl stamps, princess stamps but surprisingly - no fairy stamps.....   So, when flicking through my catalogue of stamps - (yes every stamp that I own I have stamped into a catalogue i.e. a ring binder - so I know what I have and where to find it in my craft room) - I saw this Mushroom House and knowing I have fairy charms thought it would be perfect!


I stamped and black embossed the mushroom house image and coloured it with Twinkling H2Os.  I used diamond glaze and glitter to 'highlight' white parts of the mushroom.  First I covered the canvas with patterned paper (freebie from a magazine).  Used part of a strip of grass along the bottom from a Sizzix Grass Die.  Added a saying which reads:

Live among the flowers
Dance with the petals
Laugh in the sunshine
 
Inspiring isn't it! The saying is from Prickley Pears stamp set - Flowers.  I black embossed this on white, mounted it on the same patterned paper and them mounted it again on black to make it stand out.  I then added my Fairy charm with a brad and sat this in behind the corner of the house.  I hadn't originally put the sun on there but felt it was lacking something - my beautiful crafty friend (who I was crafting with at the time) suggested a "sun" to fit in with the saying - so I used the sun from Pollycraft Surf's Up stamp set.  I clear embossed this on yellow card and it goes perfectly - thank you crafty friend - great suggestion!  


Added a red ribbon around the bottom and made a double bow for the corner and ta-da finished!
This was one of those 'secret' birthday presents - so I have no idea of the recipients reaction - hope she loved it!

Enjoy the rest of the weekend!
Shell
xox

Tuesday, 8 October 2013

Stampin'up - Santa's list

Hello everyone
Summer is certainly here, too hot for Santa's suit, so I had to create a frosty scene for this stamp design.
 I have reversed a canvas and lined the inside with white card. The paper on the outside is from Eastern elegance pack. An aperture was die cut using sizzix rounded tags die. A second piece of white card was die cut and added behind, and the top left corner was then embossed with Northern flurry folder. Some silver snowflakes(from Warmth and wonder) were stamped and the Greetings stamped and then embossed in black powder.
 I stamped Santa in black stazon, onto more white card, masked him, and then stamped Special season tree in olive, and the small snowflake in silver metallic ink. Santa's beard is coloured with white gel pen, his gloves in white craft ink,  his suit and hat in cherry cobbler, and his face with crumb cake. Dazzling details and gold marker highlight the decos on the tree.
The moose is from Walk in the Wild, stamped in suede, cut out and coated in crystal effects.
The two outside trees are from lovely as a tree, stamped in olive and suede marker and cut out. They are sponged with white craft ink to look misty. A strip of basic grey card has been embossed in square lattice folder and added across the bottom, sponged in white ink and painted with frost white shimmer. The sentiment is stamped in black stazon. The die cut leaves are stamped, coated in crystal effects and glittered.
Santa's hat, sleeve cuffs and coat front have been coated with polar white Flower soft, and a small pom pom added to his hat. The pieces were then all assembled, the outside trees and embossing were painted in shimmer white frost, a naturals button tied with twine and a small silver paper star added beneath the leaves. A few rhinestones in the snowflakes, and a frosted embellishment in the top left corner finished off.
This design is great on an easel or can be used as a wall hanging.
Enjoy your week and have fun crafting
BaRb


Tuesday, 24 September 2013

Creating with BaRb blog-Stampin'up- Walk in the Wild

Stampin'up- Walk in the Wild
Hello
Today I have for you one of my designs for Walk in the Wild.
                                   This design is a small canvas, as a change from a card.
The moose was first stamped in suede ink with the grass inked with olive marker. The moose was masked, and the grass stamped a second time.
The trees are from Lovely as a tree and were stamped four times. This was stamped on white card, then trimmed to fit the canvas with the trees being trimmed around at the top. The edges were distressed then inked. The background was shaded with chalks. I have dotted the trees and the area above the moose, with white gel pen to simulate falling snow.
The tree image was stamped a further five times on another piece of card then individually cut out and the edges inked. The canvas panel was covered with paper. The trees were attached to the back of the stamped panel and this was then attached to the canvas.
Chevron ribbon, with linen thread wrapped around it was placed across the bottom. Leaves and acorns are from Autumn accents die. A natural button tied with linen thread, a sentiment cut into a banner and a frosted embellishment were final touches.
                                                 I hope you find this design inspiring. 
                                 My card designs for this set are on BaRb'n'ShEll creations blog.
                                                                     BaRb

Saturday, 7 September 2013

Australiana Mini Canvas

G'day Mate,

Can you be any more Australian than that??  I was very fortunate to be able to Homestay some Japanese Students a few weeks ago.  We were invited to have dinner with the Teachers who were travelling with the students and as a sort of 'thank you' we were asked to bring a small gift each.  I created this Australia themed Mini Canvas - told you I was addicted!! 

 
The background paper is covered in a boomerang print, I stamped, coloured with markers, then clear embossed all the animals.  I printed the Australia image off the internet and backed it with blue card to make it stand out, and the flag is a sticker.  Added some ribbon to the top left corner and across the bottom.  My husband suggested to add the koala key-ring and it worked perfectly! 
I clear varnished the easel and I glued the canvas to the easel to hold it all together better.
Then I made the box to present the canvas in .....

 
The kangaroos on the paper are shiny foil like, and I made a small card featuring a koala to complete the gift box.  The Teacher who received my gift loved it!
 
Last year, I travelled to Japan and had the opportunity to Homestay with a Japanese Family myself.  This is the canvas I created as a thank-you to them.....
 
 
So much simpler - and now that I look at it - it looks kind of bare (Hehe - I was going to type bear - but "a Koala is Not a Bear").  I hung an Australian charm from the bottom. 
 
So if you have seen my Pinterest Boards this explains why I have a Board named Shell's Australiana.
I have had a few Homestay Students now - from Japan and also America.  Quite an experience if the Students don't speak much English!!
 
Oyasuminasai!
Which means Goodnight in English or
maybe I should say:
Goodnight, don't let the bed bugs bite!!
Shell
xox