Hello
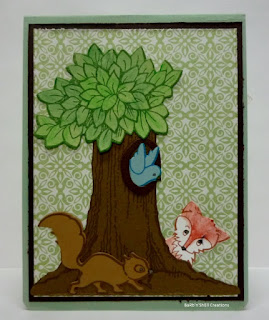
These cards have been created using stamps and dies from Stampendous.
Fran's Pop-Up Die set was used for the mechanism of all cards, and various stamp and die sets in the range were used for embellishment
Pop Up Forest set.
Patterned paper used on the card front and insert, with white card for a message panel. Images were stamped on to coloured card with Archival ink or to white card and coloured with sponged on ink.
Build a Bouquet Set. Embossed panel on the card front uses Alfred's Birds folder by Craft Concepts.
Build a Bouquet set. Embossing folder is Butterfly and Leaf by Kraft Kingdom.
Rose Bouquet set. Embossing folder is Roses, a Cuttlebug design
Rose Bouquet set. Roses embossing folder.
Daisy Mix set. Daisy Pattern embossing folder, from Cuttlebug.
Build a Bouquet set. Daisies embossing folder, by Cuttlebug.
Daisy Mix set. Birds and Swirls embossing folder, from Cuttlebug
Bird Blossom set. Tree with Leaves embossing folder by Darice.
Bird Blossom set. Daisies embossing folder
Daisy Mix set. Daisy Pattern embossing folder.
Textured card is used for all card bases and pop up inserts. The border designs on the insert panels is part of the pop-up die set and I have used the negative die cut section on the card fronts.
Watercolour card and Archival ink is used for all images and all are coloured with watercolour pencils.
Massage panels are smooth white card die cut with Spellbinders dies.
The embossing on the front panels was lightly sanded back.
Flower soft is added to daisy centres and clear Wink of Stella pen added to sections of other flowers.
Rhinestones add the final touch to all designs.
These cards are a little time intensive, but the end result is really worth it.
Till next time
Keep happy
BaRb
Tuesday, 30 May 2017
Thursday, 25 May 2017
Bags
Hello
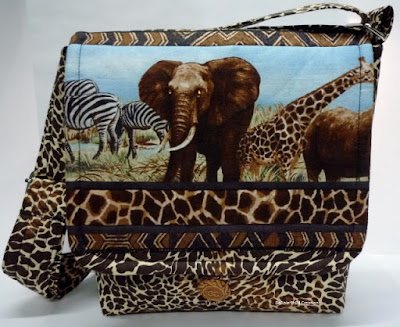
For a change of pace, this time I am sharing the latest bags in my African animals range.
The bags are satchel style, machine washable, are fully lined, have wadding, and have a divided pocket in the lining.
Straps are adjustable, and are long enough to comfortably wear cross body if desired.
I hope you enjoyed this little change, but till next time
Keep happy
BaRb
Friday, 19 May 2017
Beautiful Papers - Gatefold Dragonflies contd.
Hello
In a previous blog, Gatefold Dragonfly cards, I mentioned using remaining papers for additional card fronts. Here are those cards
As the papers are so lovely I simply punched the top right corner of each piece, then matted it to coloured card to match, with the top right corner rounded. This was then fixed to a coloured card base to match.
To this card I added a swan, die cut from pearl card, highlighted his beak and feathers with black and added a gem for an eye.
Thin lines of stickles glitter glue highlight the water, and coloured pearls finish the design.
The matted paper panel on this card is embossed in Kaszazz Leaves folder before attaching to the card front. A dragonfly die cut from glitter card was added, and pearls added to the dragonfly body and corners of the card.
The top half section only of this panel was embossed in a dot folder. A butterfly die cut from glitter card and pearls were then added.
This card has two glitter butterflies and rhinestones.
Two die cut, glittered bees with oval rhinestones added to their bodies, rhinestone flower centres and corners. Stickles was added to the daisy centres.
A glittered, die cut bee and butterfly, and some
rhinestones were all that was needed here.
A stamped insert was added to each card.
By creating first the gatefold and then these cards, I got to enjoy the whole design of these beautiful papers.
Keep happy
BaRb
Sunday, 14 May 2017
Darkroom Door - 1920 Chic - Red...
Hello,
These fabulous cards are created using one of my absolute favourite Stamps sets from Darkroom Door - 1920 Chic!
I stamped the images on white and then again on red card. I then used the paper piecing method and have overlaid the cut out red pieces on to the white images...
This set also includes images of perfume bottles, 1920 style labels, wording - 'style is eternal', 'elegance', 'true friends never go out of style', 'chic' etc
Of course, as always...
"When in doubt... wear RED!"
Shell
xox
Tuesday, 9 May 2017
Gatefold Dragonfly Cards
Hello
In my stash were these beautiful papers from Pastime Crafts. There was only two sheets each of 15 x 15 cm papers, and it seemed to be a shame to cut them up or cover them in a design, so I came up with this gatefold design
The card for each design is matched to the main colour in the papers, and the dragonflies are die cut from glitter card to match.
For each card 1 sheet of paper was used for one front panel and the inside panel. The second front panel was cut from the second sheet of paper. (The remainder of this second sheet will be used as a front panel on another card).
Double sided sticky sheet was added to the glitter card before die cutting the dragonflies. These dragonflies were then added to acetate which formed the gate on the card front.
The acetate panel was attached to the card front with double sided sticky sheet covering the back of the half section.
A small panel of card, stamped with a dragonfly was added to the inside of each card for a message.
A small glittered metal dragonfly and three rhinestones were added to the top left and bottom right corners of the front acetate panel, and rhinestones to the top left and bottom right corners of the card.
I am pleased with the result, as the dragonflies appear to be floating across the card.
Till next time
Keep happy
BaRb
Wednesday, 3 May 2017
Gift Drawer Easel Cards
Hello
Here is a selection of gift drawer easel cards recently created.
The banner and sentiment stamp and die is from Kaszazz.
Bird and leaf stamp and die from Stampin'up
Butterfly stamp and punch from Stampin'up
Daisy stamp and die from Stampendous
Rosebuds stamp and die from Stampendous
Here is a selection of gift drawer easel cards recently created.
The banner and sentiment stamp and die is from Kaszazz.
Bird and leaf stamp and die from Stampin'up
Butterfly stamp and punch from Stampin'up
Daisy stamp and die from Stampendous
Rosebuds stamp and die from Stampendous
A variety of card and paper and other embellishments has been used. These are a special way to present a small gift.
Till next time
keep happy
BaRb
Subscribe to:
Posts (Atom)