Thursday, 31 July 2014

Autumn Leaves

Hi Everyone

Today's card celebrates the beautiful leaves of Autumn.
(Living in the tropics, we unfortunately don't have them).


Using a Kaleidocolor Rainbow inkpad - Autumn leaves-and a brayer, apply ink in a crosshatch design on to white card.
The leaves across the base are a rollagraph wheel stamp inked with versamark ink, rolled out and brushed with Perfect pearls- Pewter.  The sentiment is from Stampscapes, also stamped in versamark and brushed with perfect pearls. The top right corner is rounded, the top and bottom edges  are distressed, and the piece is then sprayed with Pewter Perfect pearl mist. Mat on to Stampin'up brushed silver card, wrap a knotted ribbon across and attach with dimensionals, to an orange card base which also has the top right corner rounded.
The leaves have been die cut from coloured card using a Spellbinders die and stamped with a texture stamp for the veins. The red leaf has been misted with pearl spray, and the orange leaf has been edged with gold paint and coated with crystal effects. The red leaf is fixed with glue dots and the orange leaf raised with dimensionals.
The insert is stamped and attached, and the card front finished with pearls and a rhinestone coloured with alcohol marker.
Did you admire the leaves this year or gain crafting inspiration from them?
BaRb

Tuesday, 29 July 2014

Stampin'up-Summer silhouettes

Hello
Card for today features Stampin'up Summer silhouettes


All products used are Stampin'up, with the exception of the Stardust pen.
Card used is white and eggplant. Inks used are olive, plum, eggplant and indigo. Ribbons used are white, plum and white bakers twine.
The front of the card base is randomly stamped with images from summer silhouettes. The focal images are stamped on to white card. This is layered into the frame which is die cut from eggplant card using the On film framelits die, and then matted onto white card which has been embossed in the Stylish stripes folder. This whole panel is then attached with dimensionals to the card front. Bows are tied in plum and white ribbon, layered together, and tied round with twine tied threaded through a vintage button.
A sentiment from Teeny tiny greetings is stamped on to white card, and punched with Modern label punch. The bows are fixed to the lower centre of the frame with the label tucked beneath. Rhinestones are added and the focal flowers highlighted with stardust pen.
The insert has been stamped with a sentiment from Wishes your way.
I hope you enjoy this card and till next time
Be happy crafting
BaRb

Monday, 28 July 2014

Steampunk Canvas...

Sprockets, cogs, owls, gears.... All things Steampunk - gotta love them!!!

Hi, today I am sharing with you one of my most favourite projects that I have ever created! A Steampunk reverse canvas. (Reverse canvas meaning you turn the canvas around and create your project in/on the back of the canvas).

Now, please excuse the photos - with all the shinyness of the bling and silver card - it was really hard to take great photos!


The canvas I used is a 15cm x 15xm (6x6) canvas, which I covered with Stampin' Up paper. I then ran some silver foil cardstock through my cuttlebug using Tim Holtz Alterations Steampunk Texture Fade Embossing folder.  This is the background of the canvas - before I adhered this into the back I randomly swiped Black Stazon Ink all over it to give a weathered look.

Next, I set to work cutting cogs, sprockets, leaves, birdhouses, a fence, grass, a butterfly and two owls. (I will list at the bottom the dies etc I have used).


I used various cardstock and papers to create my canvas - black cardstock and metallic papers, shiny silvers and brushed silver cardstock.


Can you see the fairy charm and the cog charm?

Now for a list of the products....

Canvas 15cm x 15 cm
Stampin Up Paper to cover the canvas and for birdhouses
Black Card for sprockets
Black metallic paper for grass along bottom of canvas front
Silver Foil card for background and owls
Stampin Up Brushed silver cardstock for fence, leaves, cogs and butterfly
Tim Holtz Alterations Steampunk Texture Fade
Tim Holtz Alterations Garden Greens Bigz Die
Tim Holtz Alterations Gadget Gears Bigz Die
Taylored Expressions Die - Sprockets Border
Cheery Lyn Designs Die - Owls with Gears
Cheery Lyn Designs Die - Gears Butterfly
Impression Obsession Die - Birdhouses
Impression Obsession Die - Grass
Impression Obsession Die - Fence
Fairy Charm
Cog Charm
Assorted rhinestones and bling
Coil and reed embellishments
Stampin Up Brads in sprocket centres
American Crafts Zing Glitter Black emboss powder for detail on cogs
Black Stazon ink
Silver twine

Phew, I think that is all!  If there is anything I have forgotten - please let me know!!

Hope you like my Steampunk Garden as much as I do!?!
If you wish to purchase this fabulous creation, please visit:

Thank you for popping in on us again, we will be back again soon!
Shell
xox


Sunday, 27 July 2014

21st Birthday Cards...

Hello beautiful crafty people,

A couple of posts ago, I shared with you a Mini 21st Album I have created.  In my post I mentioned the 21st Birthday Cards that we also have for sale in our Online store.  I thought I would show you some of these cards as well. 


A selection of colours and card folds.


A chocolate Easel Card.


A Z-fold card.


A couple of square cards. 


Every card features a key charm!
To purchase any of these 21st Birthday Cards and many of our other creations, please visit:


Looking forward to your next visit,
Have a fantastic day!
Shell
xox

Friday, 25 July 2014

Fancy Pants - Birthday Cards Part 2

Hello,

Hope you are having a fantastic day!

More quick and easy Birthday cards to show you - using the leftover Fancy Pants papers from the Wild About Scrap's  Mini "Baby" Albums I created here    http://barbnshellcreations.blogspot.com.au/2014/04/fancy-pants-baby-mini-albums.html


There is a bit of a butterfly theme happening here!


I created the orange card (top left) first - loved it so much I made two more!!


The butterflies in the top left card of this photo are actually the punch-outs from the other two cards - double sided paper - is fantastic - especially when you are able to create with both sides!!

Thanks for visiting us today,
Shell
xox  

Thursday, 24 July 2014

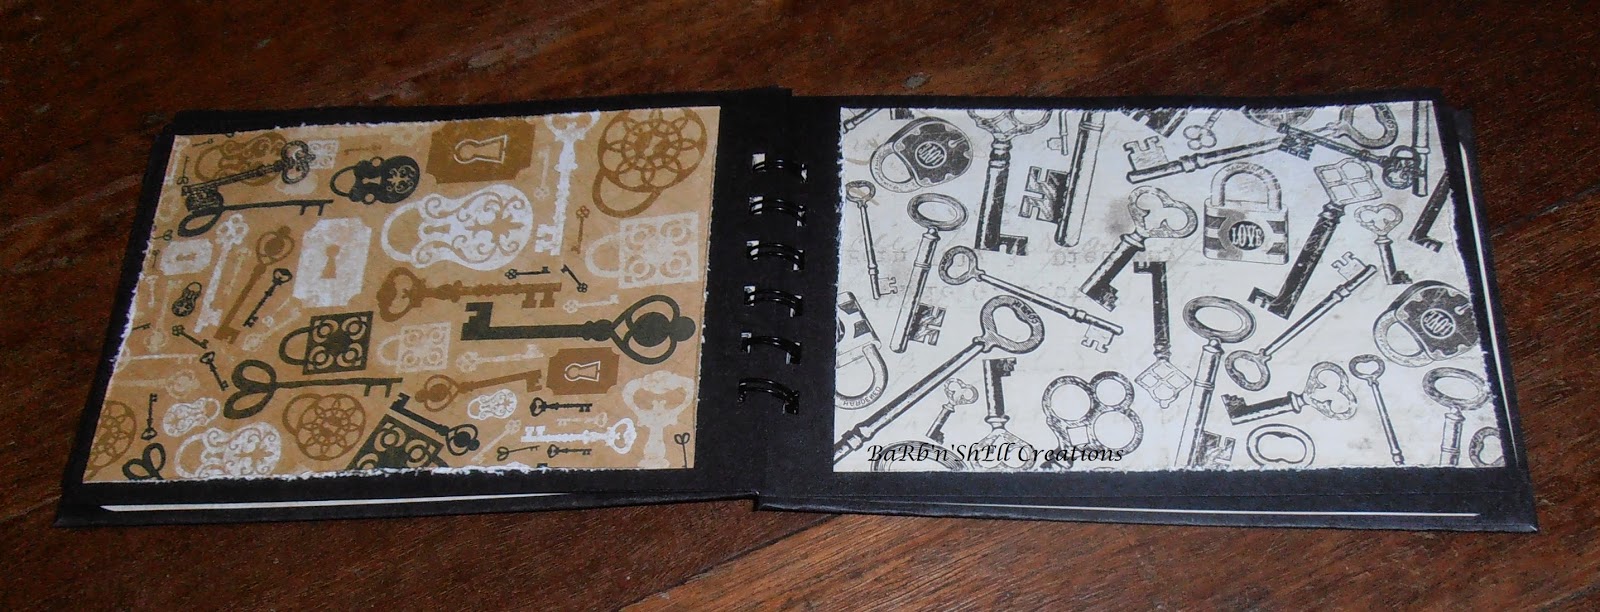
Mini Album - 21st Birthday...

Hello,

I had a couple of gorgeous papers with keys on them - the perfect papers to create a Mini Album suitable for a 21st Gift. I created the album from scratch - using a thick card for the cover and black paper for the pages.


I covered the thick card with the same black paper that I used for the pages.  After binding the pages with my Zutter and owires, I added the patterned paper to each page.


Each page also features a silver embossed key in the opposing top corners.


The patterned paper on the front cover is mounted on silver glitter paper, has a silver key charm and a glossy accented "21"

Heading to a 21st soon? - this is the ideal gift for male or female - you could add photos first or the recipient could add their own photos after the party!

To purchase this Mini 21st Album, please visit our online store ...


and while you are there have a look at the selection of 21st Birthday cards that we have available!

Hope you are having a great day!
Shell
xox


Monday, 21 July 2014

Stampin'up- Bloom with Hope

Hi there
This card is made using one of Stampin'ups new Hostess sets - Bloom with Hope


I used black card for the base then added a slightly smaller layer of cantaloupe card. On to a same sized layer of Sweet sorbet paper I have stamped a sentiment from Sassy Salutations set, in the top left corner and embossed with pewter embossing powder. I then stamped the leaves from Bloom with hope, three times, using Memento ink, just below the centre and pleated a strip of ribbon below this. The leaves were coloured using alcohol ink markers. This panel was then taped to the card front.
The flower was stamped twice on to white card, then cut out, leaving one flower whole and cutting just the upper layer from the second. The flowers were coloured with alcohol markers, then shaped with a ball stylus and layered together, then attached to the card using dimensionals.
The insert was stamped with a sentiment from Perfect pennants greetings.
Crystal effects was added to the centre of the flower, then sprinkled with ultra fine Flower soft and glitter. A sprinkling of black rhinestones added the final touch.
Enjoy your crafting
BaRb

Sunday, 20 July 2014

Stampin'up-Beautiful People

Hello
Quick and easy is the card for today.


Using Summer starfruit ink and white card, stamp the image Beautiful people. Distress the edges and mat on to a larger piece of summer starfruit card which has been embossed in the decorative dots folder, and also had the edges distressed. Wrap the lower edge with gumball green ribbon and tie the ends in a bow to the left of centre. Add the panel to a white card base.
Stamp the sentiment section of the image on to a piece of white card, using gumball green ink, then punch out with the decorative label punch. Add this over the sentiment section of the original stamped image using dimensionals. Highlight the flower centres with stardust pen.
The insert has been stamped with a sentiment from an older set, A rose is a rose.
Rhinestones finish off the design.
Make the time to craft and relax
BaRb

Fancy Pants Accordion Flip Album

Hello,

I love this idea - an accordion flip album - created from a 9"x12" piece of cardstock...


Cardstock is scored at 4" and 8" along long side, rotated to the right and scored down the centre at 4 1/2".  Then fold the card accordion style. 


Plan where you wish to adhere your patterned papers according to where they will be positioned when the album is folded i.e. front and back covers.

I added pockets for tags, to two of the flat sides (where there are no flaps) and the third flat side is the front cover.


Photos of the accordion album from both sides.


I was inspired to create this album by:
Thanks Virginia - I will definitely be making more of these!

Be back soon,
Shell
xox


Thursday, 17 July 2014

Rainbow Ink Pads

Hi there
I hope you have been enjoying your day. I have been playing with some of my Kaleidacolor rainbow ink pads and have a couple of cards to share with you.


The first card has the owl image from IndigoBlu Hocus Pocus stamp set, and the Thank you sentiment is from a Darkroom Door set. I used the Denim rainbow ink pad for the image, stamped on to white card and matted on to white card, and versamark ink and white embossing powder for the sentiment. The image is outlined using a white gel pen. The insert has a sentiment from the Hocus pocus set stamped in denim rainbow ink.


This second card has an image by Inkadinkadoo, stamped with Creole spice rainbow ink, matted on to Crushed curry card and then layered on to white card, and the sentiment from Kaszazz Carpe Diem set stamped with Stampin'up Midnight muse ink and clear embossed. The card front is embossed in clouds embossing folder and is layered with torn paper. The star fish embellishment is created using Mod melts.
The insert has been stamped with Stampscapes lighthouse and cattails images and a sentiment from Kaszazz Embrace possibilities.
Both cards are based on Stampin'up Midnight muse card. The main images on both cards have been highlighted with glue pen and diamond glitter.
You can achieve some really great effects with these inks. I hope you have found some inspiration here.
Till next time- Happy crafting
BaRb


Tuesday, 15 July 2014

Bicycles, bicycles, bicycles and Cardiac Challenges...

Hello,

Every year, the Far North Queensland Hospital Foundation and Mount Franklin hold a fundraiser - "Cardiac Challenge".  This is a non-profitable Charity fundraising event where all the funds raised will be used for equipment and support Cardiac Services at the Cairns Hospital.

A close friend of ours (Bronwyn) has teamed up with her sister (Erin) - "Sister Act" and are participating in the Cardiac Challenge - where they will be required to ride their bikes from Cairns to Cooktown  on August 29-31, 2014!

A couple of weeks ago, "Sister Act" had a wine and cheese evening, for which we created a donation for one of their raffles...

As it is a bike ride - guess what we used as our theme????


We created a selection of cards - 5 in total and a gorgeous little box to hold them.
The above is a photo of the box.

And, here are the cards...


The stamps used are Stampin' Up and Kaisercraft stamps (If you would like to know which stamps in particular - please send us an email and we can let you know)


Last years fundraising event raised $374,741.84 !!  Fantastic!  This year they are hoping to create a new record!  If you would like to assist "Sister Act" with their fundraising goals for the Hospital Foundation, please visit:


The Far North Queensland Hospital Foundation and "Sister Act" are most grateful for your generous support!

We wish you all the best - Bronwyn and Erin!
and we wish you all the best for the next challenges you face in your lives - crafty or otherwise!
Barb and Shell
xox


Cogs and Wheels Cards

Hello
Today we have a selection of cards featuring Cuttlebug Cogs and Wheels cut and emboss folder.

The first card has the embossed frame cut from red co'ordinations card, sanded lightly and rubbed over with metallic silver rub on paint. The centre section has been cut from silver foil card with the embossing highlighted and the sentiment stamped with black stazon ink. A lace design is randomly stamped in pink stazon. The winged heart is from Kaszazz Embrace Possibilities and is stamped with stazon on to acetate, and taped behind the red frame and over the silver section. The whole panel is matted with red foil paper and attached with dimensionals on to a black card base. A red rhinestone heart is attached to the stamped heart and a black rhinestone flourish and some red roses added to the bottom corner of the frame.


This card is made the same but has the outer frame in silver foil card, the inner frame in ivory card and the images from Kaszazz Carpe Diem set. Two die cut cogs have been embossed, rubbed over with metallic silver, and attached with a metal brad.


This card is in grey with the centre frame trimmed down, distressed, stamped with an embossed sentiment and attached over white card. The cogs embellishment has been embossed then heat embossed with pewter embossing powder. There are metallic brads in each corner.


The final card has an ivory base with the edge embossed in the folder and shaded. There is a layer of torn black card, then the frame of patterned paper, embossed, sanded, and torn back. The stamped embossed section is in silver foil card. There is a small cog, attached with silver brads in opposite corners of the centre section. The insert is stamped with images from Cogs, Carpe Diem and Embrace possibilities from Kaszazz.

Some inspiration for those of you who love the grungy, metallic style.
Till next time - Keep happy crafting
BaRb

Monday, 14 July 2014

Gift Bags....

Hello,

I have more Packs of Gift Bags to show you in different colours - 4 colour packs today so a bit of a long photo heavy blog....

First we head to the jungle - with Animal Prints...


Next - Pretty Purple Butterflies....


Then, the elegance of Black and White...


And lastly, the Classic Neutrals...


Please purchase these bags (with their Bonus co-ordinating Tags) through our online store:


Sometimes, I think the wrapping is just as important as the Gift!
Shell
xox